Creating a Company
This document contains a step by step guide to creating a company. Each company can be an entity of your business.
Adding a company
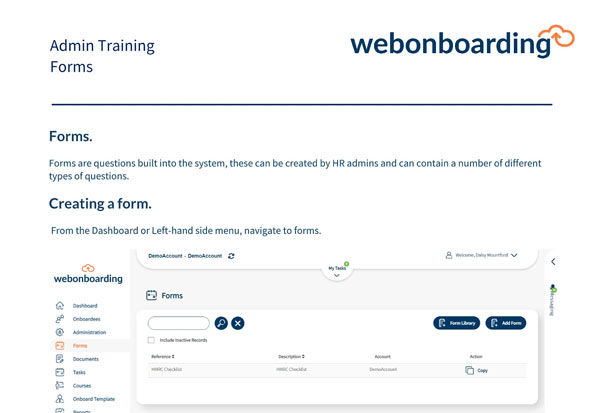
From the Menu, navigate to Administration

Click the “Companies” button from the sub menu. You will then see the “Add Company” button on the right hand side.

General
Here you will then be able to fill out the relevant information relating to the Company you are adding.

|
Field |
Description |
|
Reference |
String value, must be unique in that Account |
|
Name |
String value, Company Name will be a merge field available across the system |
|
Description |
String value, an internal description of the Company for reference |
|
Status |
Active – Live Companies; |
|
Default HR Contact Email |
String value, will be available to Onboardees of this Company |
|
Default HR Contact Email |
String value, will be available to Onboardees of this Company |
Configuration
Continue to work your way across the tabs clicking “configuration” tab next.

|
Field |
Description |
|
System Date Format |
Drop down menu, selects date format that this Company will use inside the system |
|
Document Date Format |
Drop down menu, selects date format that this Company will use for merge fields inside Documents |
|
Document Timezone |
Drop down menu, selects timezone that this Company will use inside Documents |
|
Request Alternative Start Date |
Either enables or disables the ability for Onboardees to request alternative start dates during their onboarding process |
|
Request Onboardee References |
Either enables or disables requests for Onboardees to supply References during their process (default is on) |
|
Number of References |
When References are enabled this allows you to set the required number of References per Onboardee (default is 2) |

|
Field |
Description |
|
Region |
Drop down menu, selects regional variances for UK, US and Australia |
|
Validation (UK only) |
Tick box, when selected you can choose to validate data Onboardees enter, see details below |
|
Sender Reply-To Email |
This is the email address that replies will go to when someone responds to a system generated email |
|
Sender Display Name |
The name that displays in the From section of a system generated email |
|
Regenerate Documents |
Tick box, when selected Signed Documents and Contracts will automatically regenerate when changes are made to an Onboardee process |
|
Display |
Option to select whether additional Signing Documents appear in the Offer section or Document section for Onboardees |
|
Onboardee Completion |
Tick box, when selected the onboarding process will be marked as completed by HR when an Onboardee marks their process as completed |

|
Field |
Description |
|
Validation (UK only) |
Tick box, when selected you can choose to validate data Onboardees enter |
|
– NI Number |
When selected it validates that the entry matches the NI Number format |
|
– Address |
When selected it allows the Onboardee to search for their address |
|
– Bank Details |
When selected it validates the Account Number and Sort Code against the Banking Database |
Address
The next tab “Address” is where you enter the address of the Company you are creating. This will be the address that is used when merging Company information into emails and documents.
Onboardee Options
This is where you can customise the information you gather from Onboardees.

|
Field |
Description |
|
Enable Ethnicity |
Tick box, when selected the Onboardee will be asked to supply an answer describing their ethnicity |
|
Enable IBAN |
Tick box, when selected it displays an input box for the Onboardee to enter an IBAN number |
|
Enable Swift Code |
Tick box, when selected it displays an input box for the Onboardee to enter a Swift Code |
|
Enable NI Number |
Tick box, when selected it displays an input box for the Onboardee to enter their NI Number |
Additional Information
You can use this tab to add any additional fields to the onboarding process (see our additional merge field guide to see how to do this).

When completed click “Save” to save and create the Company

Once saved you will be able to access the Email Templates and Customisation options for this Company to adjust those settings and messages. Please see the separate guides for those sections.
Please note, when setting up a new company you will also need to add operators (users) to that company or you can give existing users access from the Operators section.